
It’s probably time to jump in on some of the suggestions you’ve been posting in the Skribit box. This one is an easy one to explain, but I’m not sure how satisfied people will be with the answer.
When you first view a Raw file in Lightroom, you are looking a camera rendered preview of the file, embedded in the file. This embedded Jpeg is what you see on the camera LCD as you shoot. Because it’s a rendered Jpeg, it has all the camera settings like saturation, contrast, picture style/mode, etc applied to it.
The Raw file itself however has no inherent settings and is actually a pretty dull and lifeless looking file. So when you import a Raw, the preview goes from this rendered Jpeg to a preview based on whatever Develop settings you’ve chosen in the Import Dialog. Quite a lot of people choose the default rendering, which adds a small bit of brightness and contrast, but little else. This has the apparent effect of going from a pretty file to a dull file as the preview is created. Lightroom isn’t actually throwing away settings, but it’s hard to shake that feeling.
Fortunately there is a way around this. First and foremost, Lightroom 2.2 added the new Camera Profiles to the installer, meaning you can choose a setting to emulate your camera picture style/mode. Go to Develop and then click on the last panel on the right. This is the Camera Calibration panel. The first section is the Profile section.
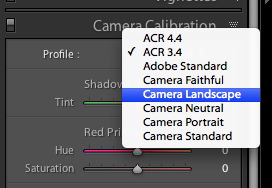
From here look through the options, like Camera Landscape or Camera Vivid and find one that suits your photo style. Next add contrast and saturation using Basic or Tone Curve. Finally, hold down the Alt Key (Option key on Mac). The Reset Button on the bottom right of the right panel will change to Set Default… Click this button and then in the following dialog choose ‘Update to Current Settings’. As you can see in the dialog this creates a settings for the camera that the shot was captured with. Repeat to get your preferred default for all your cameras.
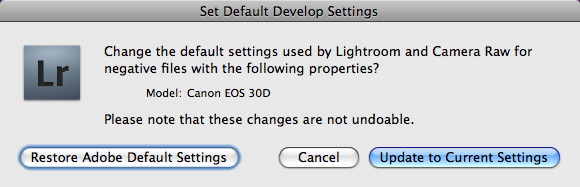
If you feel the settings aren’t working out, you can use the other option in the menu to restore the Adobe default settings, then start from scratch.
Once you’ve customised the settings in this way, they will be applied on Import for that camera, until you change or reset them.


I agree with Jon but to make things a little simpler, I think taking a typical picture in both RAW and JPEG simultaneously will help you to create a setting to which you should import. That way you have a JPEG file to base your settings off of and can tweak Lightroom till your RAW file looks like your jpeg. That way you you know what to expect on future imports.
Excellent post that explains how Camera Profiles and Presets works!
I’m using LR 2.7 #64 on Windows 7, Camera Raw 5.7 and a Sony A900. Why won’t I get all the Landscape etc. options in the Profile list? I only have ACR 4.6, Adobe Standard and Adobe Standard beta 2.
Any thoughts on this?
Chris,
At what point does the embedded jpeg become useless in developing a Raw? Pretty quickly. The embedded jpeg is really good for making selections, but is not a start point for working on a Raw. Why? Because the Raw will be different because companies like Nikon have proprietary information in the files, which Adobe chooses not to reverse engineer for legal reasons.
Adobe can hardly be a bully if you choose to use their product. And for the record, I don't use DNG, nor have I ever felt compelled to in my workflow. I'm perfectly happy using my CR2 files as is. I rarely look in the physical folders, and am not even bothered by XMP sidecar files, which is why a lot of people go DNG.
Camera Profiles give a great start point for getting the look of the embedded jpeg, and I do wish that Adobe would give them more prominence for that very reason.
This a EGO trip for Adobe and Adobe needs to knock it off and play nice!
I have been using Adobe products for more then 15 years and I have watched Adobe bully their way through the different markets and it is getting very old.
EVERY RAW file has a JPEG in it! In RAW JPEGs are very easy to read, and Adobe does see it as it is displayed at load (just as this topic states) – but Adobe coses to ignore it. I understand that LR can not read the in RAW setting to allow editing (and this is questionable since other can) of these settings, and I know they stick to the "Nikon won't share" garbage, but all all reality Adobe want to force people to the DNG format! Again the 900 pound bully approach!
Give me a break!
Capture NX2 is a far superior editor for Nikon RAW files than Photoshop will ever be – for the EXACT reason Adobe states: "The camera manufacturer’s don’t share their processing secrets".
I know HUNDREDS of photographers that are looking for a cataloging solution (not necessarily a editing solution) and Adobe is missing the mark by not allowing the folks using other tools to edit to use Lightroom – or at least in a functional manner.
Over the years I have cravatted away from Adobe Products whenever I can – I don't like supporting bullies!
Chris Sgaraglino
I am discouraged with all this. Why even bother changing things such as Picture Style, etc. if LR is not going to import the Raw file that way? I don't think a preset is going to help me since I may shoot some landscape shots and then a portrait, etc. I am now using Canon SW to upload my Raw files and do any simple adjusts. Then I'll convert them and move them into LR for cataloging. Seems like too much extra work for me.
Sounds like a metadata issue. Try selecting the Raw files, then going to Metadata>Read Metadata from files in Library.
has anyone experienced previews of raw files actually changing to show up as different images? I uploaded 2500 shots, some raw and some jpeg and the jpegs stay true but the raw switch to different shots as I vuew the previews…thoughts?
AFAIK the long exposure noise reduction is applied to the Raw. Highlight tone Priority doesn’t get applied in Lightroom…
The 5D MkII has good dynamic range, so in truth getting a good exposure in camera is always the best way. Look up Expose to the Right on luminous-landscape.com for a view on getting proper Raw exposure.
very informative article sean. thank you. i just moved from using a leica rangefinder for many years to the digital world…canon 5d mkII. regarding in-camera settings being applied to lightroom in raw format, the 5d mkII has custom settings such as long exp noise reduction, highlight tone priority, auto lighting optimizer, etc. are these settings not applied as well? if that is true, there is no point in mucking around with dozens of camera settings, and just concentrating on good exposure, focus, and composition when taking raw photos. should one be concerned with camera settings when shooting raw?
Lightroom presets for workflow. A basic starting point. First you will need your monitor calibrated. Lightroom 2. Photoshop CS3 or newer.
After working with Lightroom for about two weeks now. I found that there is a learning curve to working with develop settings and trying to find the best image. I took this up, because I was getting kind of flat looking results with lightroom only. Figured I needed a good starting base to work from.
Since I already had CS3, I took the raw file from lightroom and edited it to CS3 threw edit export. Then using curves in CS3, I used Scott Kelby’s Method of working shadows, mid-tones and highlights. From there I made any final tweaks opening up curves again.
Next saved the image and went back to lightroom 2. where it showed up as a PSD file. Next, I made a virtual copy of the (raw file) original and tried to match the same exposure, colour, contrast, etc. of the psd using lightroom. Making these adjustments in the develop module, mostly using Basic and Tone curves. After getting as close as possible to the settings I had made in curves with CS3 (psd file), I used the virtual copied clone file in lightroom to make a preset.
I called this preset “CS3 snap” and use it as my base starting point in lightroom. Works pretty good and I make tweaks from there when working with a new image. I think there is room for other presets in areas like hard backlight and Black N White. I made another for backlit images.
You will have to make new presets for every different camera you use.
Would like to know how other lightroom users are getting consistant results. Improving processes, techniques. Would like to know how it works for others. Jon L
Probably right Ken. While the settings are changeable, you can’t use undo to go back.
Suggestions? It really depends on what you’re shooting and your personal preferences.
If you shoot mostly landscapes, the Camera Landscape profile might be a good start. Personally I find it a little too red. I prefer the Camera Standard for this.
It’s a tad late in the evening so forgive me if I’m overlooking something obvious, but shouldn’t the phrase in the featured dialogue box “Please note that these changes are not undoable” should read “Please note that these changes are undoable” (i.e. without the “not”).
Any suggestions of default options for a Canon 50D ?
Ah, Creating the preset is what I was after.
Thanks
Jim
I should mention that you could also create a preset and choose that in Develop settings on Import.
That’s what Set Default does Jim. The settings you create become the default for that camera.
Call me silly, but I’m wondering (actually, I’ve looked and must just be missing it) if there is a way to apply that camera setting during import.