
One feature sorely lacking in Lightroom is a good watermark on Export. Using the fabulous 3rd party plugin LR2/Mogrify from Timothy Armes solves this issue for a straight export, but unfortunately post process plugins are not available in the Web Module. So how can we do it?
Well for my recently launched music photography website Muso Foto, I wanted nice (i.e. not the normal Lightroom one) watermarks on my images. Nothing intrusive, but something that doesn’t take from the image.

Here’s the steps I took:
1. Create the web gallery as you like. Leave the Add Copyright Watermark off. Also create a nice logo using the Identity Plate. Set the Quality high (like 95 or so).
2. Export the gallery to a folder (shortcut Cmd/Cntrl J).
3. In Library navigate to the folder you created via Import. Locate the folder with the large images. With LRB Portfolio, this is called ‘large’. In the default HTML, this may be something like ‘bin/images/large’.
4. Import this folder in to Lightroom via ‘Add to Catalog’.
5. Select all the images in the folder.
6. Click Export.
7. Using Files to Disk, I set up the export as below: Jpg, sRGB, quality 80, subfolder of original folder.
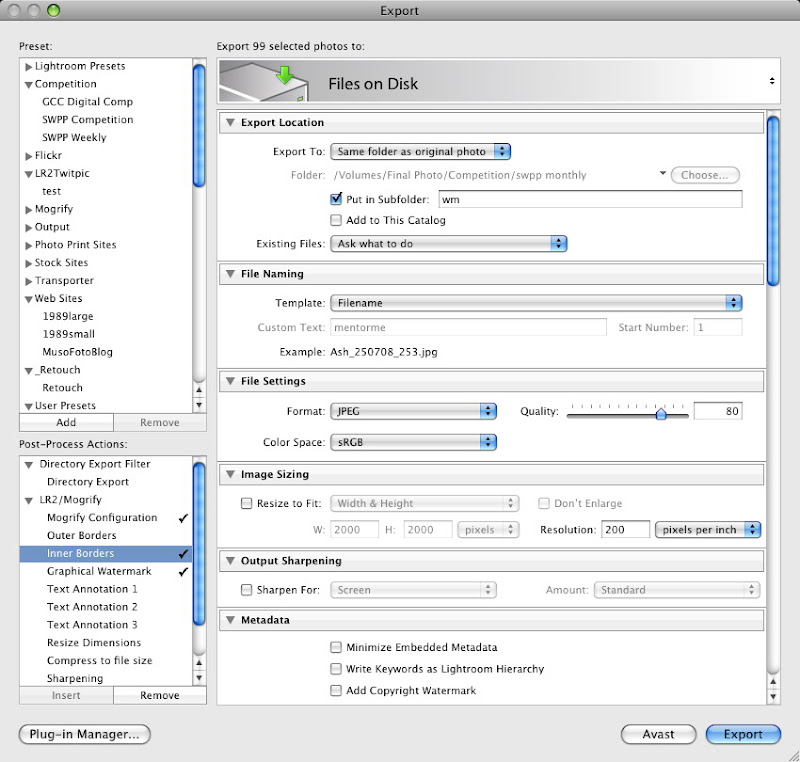
8. In the Post Process Actions section, I click on Graphical Watermark and Inner Border.
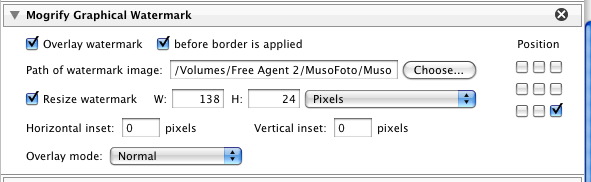
9. For the Watermark, I navigate into the Gallery folder exported earlier and find ‘logo.png’-the exported Identity Plate. I do this to keep the watermark and logo consistent. It helps create a ‘brand’. With a little calculation, I work out a size I’m happy with and enter it.
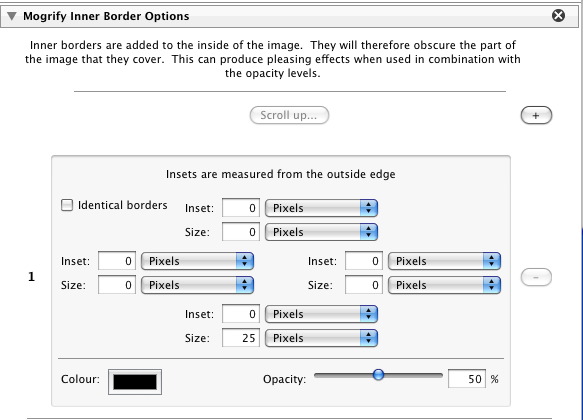
10. I also want a semi transparent bar across the bottom which encompasses the logo. With the logo being 24px high, I opt for a 25px high Inner border on the bottom. I select Black as the colour and reduce the transparency to 50%.
11. With all this set up, I hit export.
12. From there I move the images from the subfolder up a level and overwrite the original gallery images-this is in Finder/Explorer.
13. In Lightroom I remove the still selected images from the Library with the delete key and choose ‘Remove from Library’ as my dialog option. After all I don’t want to delete the image files I worked hard to create!
14. Finally I upload the Gallery.
Notes: Lightroom renames ‘-‘ to ‘_’ and forces the filenames to lower case when exporting for Web Galleries. For this reason I use the actual gallery images, which will retain their correct names for the HTML files. This is the only reason why I simply don’t export the files directly from Lightroom, overwriting the original gallery files.


Except for the renaming issues mentioned at the end of the post, I'd say yes.
When you do a high quality initial export, and then the lower quality one the 2nd time around, it's not really noticeable. I certainly can't see it on the website.
I'm curious, doesn't your re-import and export of the images at a quality of less than 100 make the images look worse do to double jpeg compression issues?
It seems to me that a better (read: higher quality) method would be to create the initial gallery as described, then take the same selected images and do a file export at the appropriate dimensions and quality settings with the watermark added to the gallery large directory.
Steve
You're up early Gene 🙂
Thank you.
Excellent and creative tip!