

The Develop module is the heart of the image processing in Lightroom. Here is where we can work on individual images and take them to their finished state. All edits in Develop are non-destructive and are simply metadata information stored in the library file. You can also choose to store your edits in sidecar XMP files by ticking box in Preferences. Using XMP files makes edits more transportable in that if you import a folder of images with their XMP files into another Lightroom Library (on your laptop or desktop for example), then your edits and ratings will show there too.
Looking at our screen capture we can see that the layout is similar to the Library module. The Nav bar at the top is the same (with Develop highlighted now) and the Filmstrip at the bottom is also the same. The central part is now dedicated to our chosen image. Develop refreshes the central image each time we edit, unlike Library and the Filmstrip which use cached copies of the image. Below the image we have a toolbar with icons running across. 
From the left we have Loupe View which is the image in its current After view. Next is the Before view which shows us the unedited state. After that we have 2 different Before and After views, one for vertical and one for horizontal. The final icon on this side is the Crop Overlay, which puts the crop box around our current image. Towards the centre we have the RGB data view, which gives a % view of the colour at that point. The two final icons on the right are the hand tool to allow us to drag the view about in any of the zoom views. Finally we have the white balance eyedropper which neutralises colour casts in our image.
On the Left of the Module we have a thumbnail view on the top left and below this we have 2 tabs, Preset and History. on the top left of the thumbnail we have a little menu that allows a number of zoom modes: Fit, Fill, 1:1 and 4:1. They’re pretty intuitive as to their sizes and the Cmd/Ctrl +/- keyboard shortcut will zoom through the modes. Onto Preset and History.
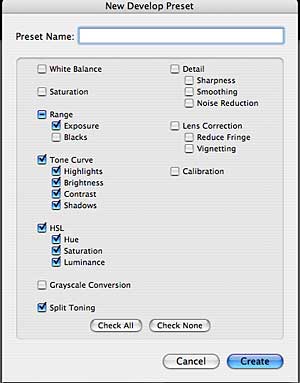
Preset is a great feature, whereby when we do a series of edits that we like, we can store these edits for use on other images as a Preset. When we hit the “+” key we get a dialog box that allows us to select which of our edits get used in the Preset. Presets are just text files and can be copied and emailed or even passed around on the Lightroom Forums.
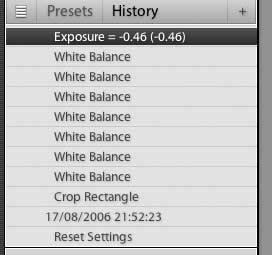
Next up is History. In History we can see the all the steps we’ve taken so far in our edits. We can jump back to any point in our editing or hit the + key to save a snapshot of the image at any point.
 The real meat of the Develop Module is on the Right Hand side. Here we have the image processing tools in Lightroom. Looking at the screen capture we can see that we have: Basic, Tone Curve, Crop and Straighten, Greyscale Mixer, Split Toning, HSL, Detail, Lens Corrections and Camera Calibrations. These are similar to the tabs and tools in Adobe Camera RAW but with a few twists. At this stage I’d highly recommend viewing George Jardines Video Tutorials as I can’t get in as much detail in text as you can in a video. Basics lets us set the White Balance/Tint and Saturation first. From there we can set our white point with Exposure, our black point with Blacks and our midpoint using Brightness. Finally we have Contrast which effectively pushes a ‘S’ shape into the Tone Curve. Next is the Tone Curve. Brightness and Contrast are mirrored from Basic and they match any move from Basic. First up we need to look at the bottom of the Tone Curve display. At the bottom there are 2 triangles, the 1/4 tone and 3/4 tone points. These set where the sliders operate from and can be moved to change what the sliders affect. Back to the sliders and the Highlights sliders first. The Compression slider lets us boost or cut the tones above the highlight tone point. Luminance on the other hand lets us boost or cut our curve centered on our highlight tone point (our 1/4 tone). For the Shadows Compression works in the area below our 3/4 tones and Luminance offers control centred on the 3/4 tone. Like I’ve mentioned we can changed how much are gets affected by moving the tone points. Next up is the Crop and Straighten. This is very straight forward. From here we can specify a free crop or even a preset crop. One thing to note about crop is that we move the image into the crop, not the crop around the image. Although it feels odd initially it’s actually much easier when you get used to it. We can straighten by dragging the image around the box or by holding our Cmd/Ctrl key and drawn a line along a part of the image we know to be straight and Lightroom will automatically straighten our image for us. Greyscale Mixer: This does what it says on the tin. There is a great auto mode and moving the sliders gives great control over our Black and White tonal balance. It is very easy to use and really makes B&W; a doddle. Next up is Split Toning which allows us to set different tonalities for our highlights and shadows. Used with Greyscale Mixer it can give fantastic toning emulation (eg Selenium, Sepia) or on Colour images can even emulate Cross Processing.
I’m going to just mention the next lot briefly as this post is becoming really much longer than I anticipated! HSL is the Hue Saturation Luminance sliders pane which allows us full control over the colour in our images. It really is fantastic and by careful examination of our film prints we can emulate the colour of these using HSL and contrast. Detail gives us control over Sharpening, Smoothing and De-Noise. Sharpening is a little underwhelming in its control and hopefully will be beefed up. Smoothing could be very useful if given local editing, but suffices to help with general noise and softening while De-noise removes colour noise effectively, but does lose detail.
Lens Corrections includes Chromatic Aberration tools and a Vignetting control which removes vignetting. In theory it can be used creatively to add a Vignette but wont work properly like this on cropped images. Finally we have Camera Calibration which allows us to create a rough colour profile of our camera. I hope you made it this far, due to the length of the post. I’ll cover Sildeshow Print and Web shortly, potentially in one post unless it gets very long like this one! In the future I’ll also be expanding on things we can do inside develop. Update: I’ll probably do seperate posts..


I really need to prepare the post better in advance, not just in the Blogger window and with the advance preparation work, do better proof reading. You’re certainly right about credibility and grammar/spelling.
Re the ‘prolly’ comment I was unaware that is is a common biker term. I suspect it’s (see that one?) an American usage which might explain that.
Just as a matter of note, I’m not trying to set myself up as some kind of expert, but I do use the program a lot and have from Beta 1. I feel that the things I’ve learned may be useful to others, especially those coming on board since the Windows version was released.
Sean
Nice blog – keep going. I’m glad you take a constructive attitude to spelling and grammar – you quickly lose credibility if you can’t distinguish your “it’s” and “its”, “loose” and “lose”, “your” and “you’re”, “their” and “there”…. Though “prolly” is prolly bikers’ dialect. Anyway for “it’s”, I recommend remembering it’s the one exception to the normal rule (actually it isn’t the only one, but look it up in Wikipedia). Once you learn it, you’ll be able to don your grammar nazi armband!
Well, I came to suggest you add to your links this one: http://www.pixmantec.com/forums/postlist.php?Cat=0&Board;=Lightroom
Johnbeardy
The you your typo is probably my most common one. I only did pass English in school and coming from my engineering background, writing is something I certainly need to get better at. I know by having something like this to do can only help.
everyone on the forums is guilty of typo and misspelling. Jeff Schewe always uses prolly instead of probably for example. And as you proved yourself, noone is immune!
“your”
Bravo for correcting it – but now you’ve no excuse for “It needs no numbers due to it’s relative nature”! In this case “it’s should be “its”. See you reply to doc_tee writes “Photographers experiences with LR” who’s equally guilty!
We can only hope Peter! There are a small few tools that could be added that would remove any need to go outside the program for 95% of my work.
I noticed you pointed out the vignetting / cropping conflict. I hope they give us a pre and post crop vignet control in v1.0. =)
That’s what using a spell checker and an hours typing does for ya!
Couple of typos for ya!
“it’s control and hopefully will be beefed up” – should be “its” since what you wrote means “it is control”. “Its” as in “its control” is an exception to the usual rule about possessives, working the opposite way to normal.
And “but does loose detail” should be “lose”. Loose use of language there.
OK, Gaelic is your native language!