
Thanks to something funny happening, I lost this post, but @MarsEdit helped me retrieve it, so here it is!
In keeping with tradition, Adobe today launched a public preview of Lightroom 3. More like the original pre Lightroom 1.0 beta program, this is a rough and ready version of Lightroom with a series of changes and new features. A lot of work in done under the hood, but there are certainly new things to be seen. Before we look at these, a word of warning. This is a beta and absolutely not recommended for general production work. Any file used by the Beta should be backed up safely before importing into the new Beta 3 catalog. Adobe is looking for public opinion on the new program, along with any bugs you may come across.
So lets that a brief look at some of the features and changes. You can, of course, find a comprehensive list at Lightroom Journal.
Import is completely redesigned, making it more of a pseudo Module. It also comes in 2 forms: Compact View and Expanded View. In Expanded View, the dialog expands to fill your entire screen. On the Left you have available volumes for import (the ‘Source’). In the centre, you have the images at the selected Source visible in thumbnail form. On the Right you have all in the controls that affect the Import. File Handling, File Renaming are here, while Apply During Import allow you to add Develop Settings, Metadata Presets and Keywords to the image. Finally you have the Destination Panel, which allows you to select from any available drive. The standard Subfolder and Date folder options from 2.X are also in the part.
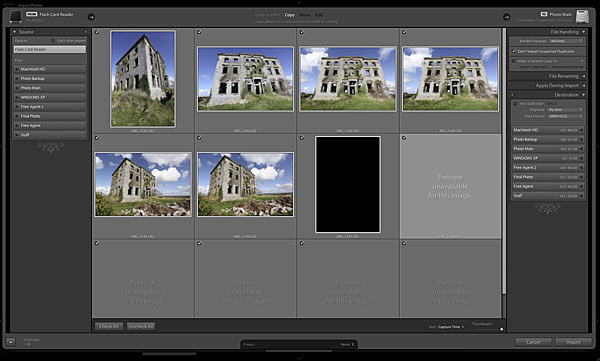
While the layout has changed extensively, the controls are much the same as 2.x, but you can obviously view more thumbnails, not to mention that the layout is more logical from source to destination. The type of Import (Copy, Move, Add or Copy to DNG) can be selected at the top of the centre panel.
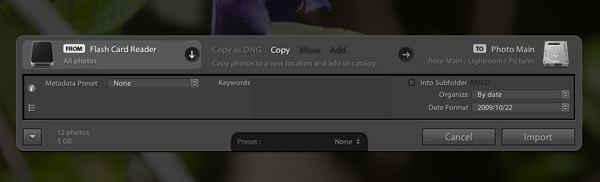
On the bottom right is a disclosure triangle that will reduce the dialog to Compact View. Compact view gives the minimum amount of information you need to get your images into Lightroom. One other feature addition is Import Presets. If you have similar Imports each time, you can set up the Import and save it as a Preset. For instance, you could have a Parent Folder with a Dated subfolder, a particular Metadata Preset and a renaming system saved as a preset.
Once your files are in, you’ll see other changes in Library. In the Left Panel you’ll notice the ‘Publish’ Panel. Currently you can Publish to your Hard Drive and to Flickr, but third parties will also be able to add to this when the SDK information is released. However based on the Flickr Publish, Jeffrey Friedl has already been working to provide provisional support for Publishing via his plugins. The idea of Publish is to bring what you do with your image under the control of Lightroom. For instance, with Flickr Publish, you can control what images appear in Flick. As you add to or remove from Flickr Publish, those images will appear, or go, from your Flickr account. Another new Panel on the Right side, ‘Comments’, will contains comments people make on Flickr about your images. Nifty. When in Publish, you can right click on a Photo to go to the web page it’s on.

In Develop there’s been some additions and changes. One thing I’m delighted to see throughout the program is a change from ‘Grayscale’ to Black & White (or B&W; depending on room). It’s simple, but more photographically correct. I’m sure both Matt Kloskowski and John Beardsworth are cheering for this. The Vignettes Panel is gone and in it’s place are 2 new Panels: Lens Corrections and Effects. Lens Corrections just takes the Lens Vignetting and Chromatic Aberration tools out of Detail/Vignetting and puts them in one panel. Perfectly sensible. The new Effects panel has a new version of Post Crop Vignette that provides a lot more control than before. You can choose between Highlight and Color Priority, along with an additional Contrast slider (available with negative amount). One thing to note is that all the controls bar Amount are not available until you actually move the Amount slider.
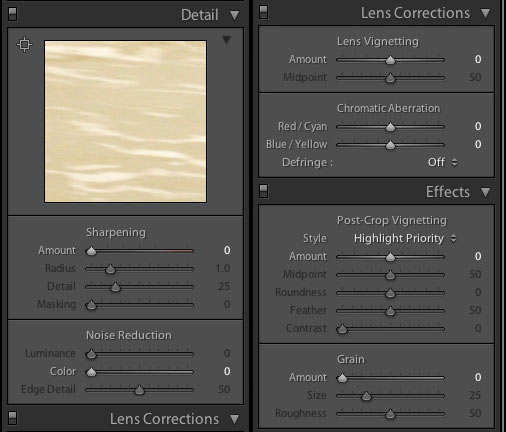
Also in Effects is the new Grain tool. Here you can add grain to your image by choosing the Amount of grain, the size of the grain and the Roughness. It is really effective in emulating film grain and really adds punch to Black and White images. It’s also useful for faking high frequency detail in colour images.
Looking back at the Detail panel, you’ll note the absence of Chromatic Aberration as mentioned above, but also the addition of and Edge Detail control. With brand new Demosaicing inside Lightroom, we’ve got new Noise Reduction control. For now it’s only Color Noise, Luminance is not connected yet. However the new algorithm is brilliant. One complaint about the 2.X noise control was that it lost detail. The version 3 Noise Reduction brings that back. If you required a lot in the past, you’ll find that version needs a lot less. As a concert shooter, I’m finding this new method helps to keep detail in my high ISO shots, while controlling the noise. Shots that looked a little mushy in the past now have better detail for me.
One addition that might not be immediately obvious is that Develop now has Collections! This will help greatly with the disconnect people feel there is between Develop and Library. It will also promote more use of Collections, which I feel are the most powerful file management tool in Lightroom.
With the change in noise reduction etc, rendering previews is currently more time consuming than with 2.X. As feature development is taking priority, speed enhancements are going to be left to near final release. Part of this change means you’ll have different process versions on older images. New images will have the new process automatically, but older ones can be converted by clicking the warning triangle in the Histogram. Generally this will look better, but if not, you can change between them in the Settings>Process Version menu in Develop.
Slideshow has a few changes. The main one is Video Export! Yeah I hear you say. I know I’ve wanted this feature for a while. There are a number of built in presets, but you can also make your own. One change on Mac is that iTunes playlist are no longer available. iTunes apparently keeps changing how it accesses Playlists and this feature can easily break, so you now get to choose a song to play with the Slideshow instead. Personally I’d prefer more than one song though as I often have 15 minute shows.
Print now has a Custom Package, so no more cheating with workarounds to get multiple images onto a page. You can also choose a background colour for the page finally. Sponsored by Epson Black Ink… Only kidding. Those using Lab prints will love this feature. And of course you can use it with ‘Print to JPEG’ to have the border colour of your choice on the image.
There a new Watermarking control to let you add Watermarks to your Prints, Web and Exports. It’s nifty and very usable. Still LR2/Mogrify offers many more features, but I think this will be wonderful for web export especially.
Well, that covers a bunch of the features I’m using and liking. There are many more, like Backup on exit rather than at the
beginning.. no more waiting on Lightroom to start! For a fuller list, check out the official announcement at Lightroom Journal, along with a list of other resources for the new Beta version. Also included is a list of known issues-yes there are of course issues, this is Beta software. So go to Labs.Adobe.com and download a copy to play with!


Michael, from previous experience as a tester, if the information is not already in the public domain, then Adobe remain tight lipped about new features. So even if I knew, I couldn't say.
I do know from feature requests that it is a popular request.
I just discovered your blog and love it. Thanks for the info. Since you
re more "in the know" than the average joes out here maybe you can answer this. Do you know if the Dev team for LR has any plans for adding comment capability. When I'm sitting with clients and they have specific editing requests I currently have to make notes in Nikonians Annotate which is great but having it all in LR would be spectacular.