
The concept of masking is pretty simple to follow. A read world example should suffice. When we paint our wall, we put tape on our light fittings, door and window frames, to prevent paint getting on them. The standard tape used is called masking tape. In Lightroom we use masks in a few places, for example with sharpening in the Detail Panel of Develop. This gives us a general edge mask on the picture, allowing sharpening to alter only the edges we select using a slider. It is quite usable for a global tool (i.e. working on the whole image). We also have masks when we use the Adjustment Brush, and in a way the Graduated filter is a graduated mask. Fill Light and Recovery use masks, but the user can’t access them directly.
I’m really here to talk about masking in relation to the Adjustment Brush. I’ll talk about current masking in Lightroom and make a brief mention of methods that can be used in Photoshop that are not available in Lightroom. To what end? Well feature request actually!
When you start painting with the Brush in Develop, you can see the effects of the slider settings immediately. Conceptually you are painting a mask that is revealing the brush settings. In Photoshop terms, it’s rather like having 2 layers, the original image layer and a new layer with the brush settings applied to the whole image (either as a copied layer, or an adjustment layer). Essentially the new layer has a black layer mask to hide it all (concealing the adjustment) and when you paint, it’s like using a white brush to reveal the new settings.
In Lightroom you can view this mask temporarily by hovering over the pin. If you are comfortable with the settings you are applying, or if you are going to alter them once the mask is painted, you can turn the mask view on by pressing the ‘O’ key (that’s O for Overlay to help remember it. You’re overlaying the mask view on the image). You can also cycle through mask colours by pressing Shift O. The default ruby colour takes a cue from Quick Mask in Photoshop.
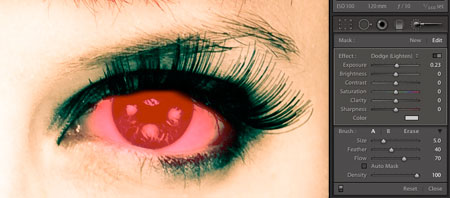
When you brush in Lightroom, you can alter the brush size (the square brackets [ & ] will change the size) and the feathering (Shift [ & ] to change). Feather controls the softness of the brush. You can also choose flow, which controls the opacity of the mask. There is also a tickbox called Auto Mask. With this one, Lightroom becomes more edge aware, searching for differences in contrast and colour, and only masks areas similar to the start point. When it works, it’s a Godsend, but often it can be hit and miss. It’s also very processor intensive.
Essentially when you mask, you have to paint it on. Auto Mask can help with edges, but you still must manually create the mask based on your own visual clues.
In Photoshop there are many ways to mask, by hand also being one of them! You can also use the image itself to create a mask. Without turning this into a Photoshop tutorial (there are already enough out there), you can view the channels panel and choose whichever channel has the most edge contrast to start creating the mask you want. Using Calculations, Refine Edges, Dodging and Burning, you can create a mask the caters to your need exactly, or close enough that a small amount of hand painting will suffice. The Pen tool can be used to make a Path, which can then be made into a selection, and from there a layer mask created.
Lightroom doesn’t offer anything like that kind of control. It needs to store the mask in the catalog, and in XMP, so it can’t afford to have a B&W; image channel stored there. It would make the catalog unwieldy, especially for large catalogs with loads of masks.
I would like to see Lightroom have more advanced masking tools. Perhaps one option would be the ability to create a mask in Photoshop and have Lightroom be able to access it and convert it to a form storable in XMP. How would this access occur? Well I envision that you could click to create a new pin, then right click on that pin. One of the options would be ‘Load Mask’. You’d need to have created a mask in Photoshop and saved it as compatible file (e.g. a flattened grayscale image, or whatever the requirement may be). Lightroom would then load the mask into the pin and save it as part of the file in the standard mask format.
Now you may say, “if you’ve created the mask in Photoshop, why not just use a PSD, or TIFF?”. Well, it’s because I’m all about the Raw. I want the mask associated with the Original Raw file. That way any Virtual Copy or Snapshot will contain the mask (now inside Lightroom, and not dependent on the location of an external file), and any further alterations I make to the file will be still a metadata edit.
I certainly wouldn’t expect this kind of request to be fulfilled in the next version, but it’s a seed planted. And by writing it down I might actually get it out of my head for now and get back to real work! Almost a thousand words that should really be on a magazine article!


It probably would be quicker.
Lightroom Masking is readable by Camera Raw though, technically can be read by Photoshop. AFAIK the masking is actually in binary inside the XML file anyhow.
I thought you would say that! ;-}} Linked files work with other applications. Also, all of your media is linked. So linking more files wouldn’t be that big a hazard. IAC, you could force users to save to a location in the catalog folder.
Problem with the form Lightroom uses is it cannot be read by Photoshop. That limits your ability to create a mask. I also suspect reading/writing greyscale files *may* be quicker than reading/writing XML.
I did cover this in the article.
Linked files could only work if they were saved to a particular location. Otherwise they’re too easy to lose.
As Lightroom does already store masks with the file, it would be more appropriate that it converts it into this form.
You could store the B&W; image of the mask outside the catalog and provide a link. Then, in Prefs, have a choice of loading all linked masks automatically, or on a case-by-case basis. You could create the masks in Photoshop or even in Lightroom if it had the tools but latter is probably asking for too much.
I would certainly love to see a feature along those lines. Masking is critical in localized updated. Of course the proper end result is that Lightroom gets a full suite of non-destructive editing tools. More powerful masking would certainly be a nice start.
That would need hooks inside Photoshop to work, which is probably asking much as CS4 is still quite a fresh baby!
Still a good suggestion.
Looks like a great feature to implement in Lightroom.
It would bring some of the flexibility of Photoshop, without loosing the non destructive aspect of Lightroom editing.
But why not imagine a slightly better integration with Photoshop: in addition to “load mask”, you may have an option to “create a mask in Photoshop”. It would export a version of your image to Photoshop, let you create your mask and “export mask to Lightroom” (or something like that).
Michel