
The Slideshow module is the third module in Beta 3. As the name implies it is a viewing tool for presentation of our images. When combined with a projector or a large screen we can certainly impress friends and clients with our images from within the Slideshow module. There has been ongoing discussion in the Forums as to the use and value of a Slideshow module in the first place. As I can only answer from a personal point of view and I have to say I like it and can only hope it will grow into fully fledged slideshow generator in time.
Not all images are destined for print, nor do all live for Web presentation either. Slideshow gives us an alternative way of outputting our images for presentation. Looking at our screen capture of the Module we can see the now standard view of our top Navigation bar/Identity Plate and the Filmstrip at the bottom. The central view here is the Grid Mode of Slideshow (shortcut key Shift-S). In this mode we can see our slideshow images inside their slideshow ‘coats’ as it were. All the parameters we select in the right hand panel affect how these look. Double clicking on one of these thumbnails or pressing Shift-E will open the image in Slide Editor view. Here we can get a better view of how the parameters affect the look of the image in our slideshow.
For a change we’ll cover the right panel first as we’re already discussing parameters. The first pane we encounter is the Image Settings pane. The Zoom and Crop tickbox enlarges our image to fit the maximum cell size possible, while ignoring our image size ratio (normally a 3:2 ratio on a DSLR), based on our ‘Slide Layout Tools’ settings. Once ticked we can then move our image inside the box by clicking and dragging the image. Next up is the Stroke tool that allows us to add a coloured stroke around our image. While we can select a colour, it would be nice if we could also select a size for our stroke. This would allow us to give our image a large border is we so desired. The next tool in the pane is Slideshows version of ‘Drop Shadow’. Here we can set a shadow behind our images in the same way that drop shadow works in Photoshop. Opacity sets the level of visibility of our shadow. Offset is how far our image appears away from the shadow, while Radius sets how soft or hard the shadow edge is. Finally Angle controls the apparent angle of the light casting the shadow. One thing that might be nice in this pane would be a sloppy borders setting to give us some paintbrush style edges for example.
The 2nd pane we encounter is the Slide Layout Tools menu. We’ve already mentioned this in the Zoom and Crop section a little. These controls let us set the maximum cell size our image takes up on screen, but is dependent on the crop of our image. Our long side will scale to fit the margin, while the other side will be constrained to fit this scaling. The Guides tickbox lets us see where these margins are on the screen.
Our 3rd pane is the Overlay Options pane. Here we set up our Identity Plate. We can use the same Plate as our Navigation bar or create a new one from the drop down menu to the right. After this we can set the opacity and scale up or down the ID Plate. The ‘Place behind images’ does as it says and puts the ID behind the image. Currently the Identity Plate is only on the Mac Beta. Next we can show our ratings in the image we are displaying and select a colour for our stars. I find a grey colour helps the ratings appear in most shots when viewing many varied images. Scale allows us to change the sizes of the rating stars. Show Custom Objects is tied to the Add Text button under the image. It affects whether or not the text appears on the image. Also Place behind images affects this text too. Add text simply allows us to add text or certain tokens to the image. These token include a range of Date, EXIF and IPTC information including Caption and Filename. Clicking on one of these text boxes lets us select edit to change what’s in the box. The Rotate Left/Right buttons change the orientation of the text. Also under the image are 2 small icons for Grid View and Slide Editor view and a playback control panel for the slideshow. The playback panel is pretty straightforward and covers Return to Start, Back, Play/Pause and Forward. 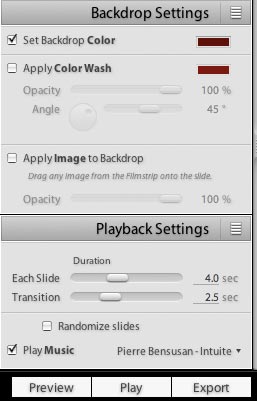 The 4th Pane is Backdrop Settings and controls the rear of our image. Our initial control is ‘Set Backdrop Color’ which sets a fixed tone background to our image. This fixed tone can be modified by the next control ‘Apply Color Wash’. Here we select a 2nd colour and together with the Opacity and Angle controls we can apply a graduated fill to cover our background, similar to a Gradient fill in Photoshop. Next we have ‘Apply Image to Background’. This allows us to take an image from the Filmstrip and place it under our image. This image remains the background image for the whole slideshow. It may only be me, but I find that although this image looks fine in preview, when you run the Slideshow it is extremely pixelated. This may be a bug.
The final pane is the Playback Settings which give us our slide running times and our transition times between slides. Both slides are visible during this time. One control not featured that is a staple of the twin slideshow AV brigade is the third image setting. When 2 transparencies are projected at the same strength at the same time they can combine to give an image that never existed. For example we could have a moon shot followed by landscape. When both slides are mid transition they give us a shot of the moon over the landscape. It could be achieved by having a hold time slider for the central portion of the transition. Next is the ‘Randomize Slides’ tickbox to give us a surprising slideshow. Finally we have (in the Mac version at least) the ‘Play Music’ tickbox. This allows us access to out iTunes playlists to add music to our Slideshow. Beside this is a dropdown menu listing all our playlists and a refresh playlist menu item. This is handy as we can go to iTunes and create a new playlist and then refresh Lightroom to allow us access to the new playlist, without the need to restart the program.
The last things in the right hand panel are the Preview, Play and Export buttons. Preview allows us to see the slideshow in a miniature version of itself in the central window. Play gives us a fullscreen view of our slideshow. When we have another monitor attached we also get an option to show the slideshow in the 2nd monitor. Export lets us export a PDF version of our slideshow, which can also be uploaded via FTP using FTP presets (editable in the dialog box). I’d like to see Quicktime movie export and, perhaps, DVD output.
The left hand pane is quite basic and contains only a thumbnail view of our ‘most selected’ image and a list of templates in the Templates Browser. The ‘+’ beside the title gives us a clue that we can add our own templates to this menu. Any changes made in the right panel can be saved to a template in this part of the left panel. If you run your mouse over the list, the thumbnail updates to give a preview of the template. So do I think anything could be added here? Well yes I do. I’d like a tab that lets us save slideshows. I’d like to save everything that would be in the template panel, along with the list of images that are in the slideshow and in their correct order.
Well hopefully my efforts are not in vain here and you found some useful information here, or even a few typos to correct in the comments as is the norm here. My next post will cover the Print Module and I’ll follow that with Web. From there posts will probably be shorter and more concise.
Tips, Tricks, Presets and Addons for Lightroom


In my local Camera Club there are some very active AV guys that have won numerous awards and prizes and the 3rd Image is their key to this success.
Hi Sean,
One control not featured that is a staple of the twin slideshow AV brigade is the third image setting. When 2 transparencies are projected at the same strength at the same time they can combine to give an image that never existed. For example we could have a moon shot followed by landscape. When both slides are mid transition they give us a shot of the moon over the landscape. It could be achieved by having a hold time slider for the central portion of the transition.
Oh yes please! This control alone would make my whole day! 🙂
If you’ve seen the AV third images, you would also realise that there is a healthy digitisation going on in that space. Slide projectors are being replaced by digital AV authoring programs, especially on the PC. I’m not aware of a really good tool that is cross-platform though, but the slideshow module with the third image slider and a high quality export for offline replaying would be a godsend.
Products like Pictures2exe and Proshow Gold work well, but there is no cross-platform player. They also cater to the wants of a far wider audience than photographers.
Michael