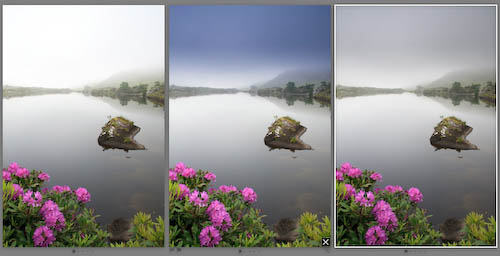
While I provide a lot of free tips, tutorials, and even galleries to users, sometimes I do a little that requires some return on my time.
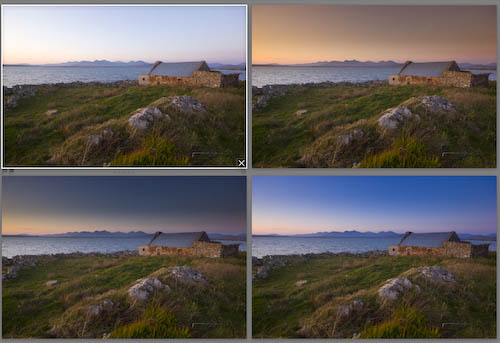
To aid users in selecting the right look for their landscape images, I’ve created a set of over 70 Graduated Filter presets to get you started with making creative choices for your images. Covering both landscape and portrait orienations, as well as hard and soft line filters, these filters come in 3 standard colours: ND (Grey), Blue and Tobacco. As is also standard, they come in strengths of 1 stop (0.3), 2 stops (0.6) and 3 stops (0.9). It was a bit of work to create this, but I’m not charging a whole lot for them, just €5.00 (about $7.75). Obviously you can tweak the settings once applied. In fact I positively encourage it!
Why should you pay for these, when you could create them yourself? Well the fact that it takes a bunch of time to put them together is the best reason. Probably more than €5 of your time. Also by running down through the Presets panel on the left of Develop, you can preview them quickly to see how they look with your image. Much quicker than mucking around with sliders.
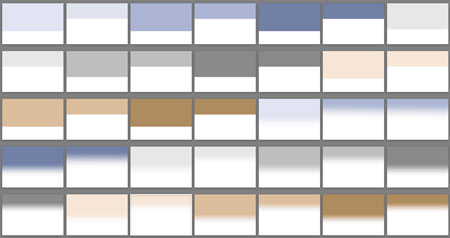
You can see some of the presets in sample form here: Download Sample Grads
To install these presets, drop the Sample Grads folder into:
User/Library/Application Support/Adobe/Lightroom/Develop Presets on OS X,
C:Documents and SettingsUserApplication DataAdobeLightroomDevelop Presets on XP-Note that Application Data is a hidden folder,
C:UsersUserAppDataRoamingAdobeLightroomDevelop Presets on Vista,
where User is your login name.
Or you can click on Preferences>Presets>Show Lightroom Presets Folders to open this folder in Finder/Explorer. Then open the Develop Presets folder from there.
The full version folder contains 4 Sub folders, place these folders in the Develop Preset location mentioned above.
You can also Right click on a preset or folder and import them from within Develop, which is fine for a small amount of presets, but for folders, manually placing them and restarting Lightroom is quicker.
The 4 folders are:
Grads: Hard-Landscape
Grads: Hard-Portrait
Grads: Soft-Landscape
Grads: Soft-Portrait
Hard Grads have a tight transition, which Soft Grads user a wider transition. Landscape and Portrait Grads need to be separate as they don’t rotate. The 3 colours (ND, Blue and Tobacco) come in 1, 2, and 3 stops varieties, equivalent to 0.3, 0.6 and 0.9 in standard filter terminology. Also as most Landscape photographers use the Rule of Thirds to compose, each type is set on the bottom and top third, allowing you to choose the nearest one quickly. To change the filter, click on the pin to select it (Press M to activate Grad Filter in Develop, if it’s not open). Drag the pin to move the centre of the grad, and the outside lines to make it softer or harder. Finally click the colour chip to change the tint. The Blue and Tobacco colours I’ve chosen are simply ones I like. You may prefer a redder Tobacco, or different blue. Actually then ones I have look similar to the Cokin set I own, so I was trying to get close to them.
To Download, add them to the cart. Payment is Paypal via E-junkie, but can also take Credit Card. Once Paypal sends notification, an email will be sent with a download code.
Windows user that experience security issues related to downloaded Zip files should try an alternate decompressor such as 7-Zip.
Update: On the advice of Richard Earney, I’ve rezipped with BetterZip to remove Mac related components. Please let me know it you’re still experiencing trouble after redownloading. Also rather than clicking on the link in the email, copy and paste it into your web browser. This works fine for me using XP under boot camp.
Update #2: I’ve found one of the presets had an incorrect value which has been fixed and the packages reloaded. Please download again. Apologies. I did check them before I posted, but somehow missed one.
Update #3: A few people commented the Portrait grads were upside down. Well, they’re not.. They just shoot upside down! Seriously though you should turn the camera so you shoot with the shutter button up. It makes the camera more stable. Anyway for those that shoot upside-down, I added another 36 presets, duplicating the normal ones, but upside down. In fact they probably got more love!
A look at the sets:
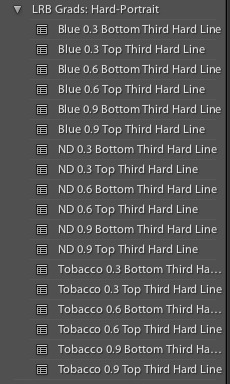
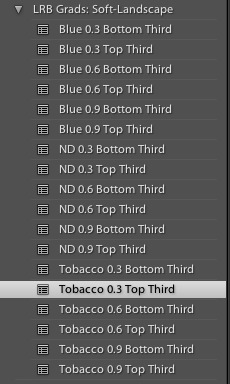
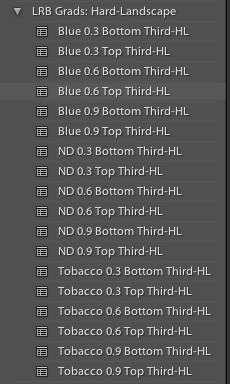
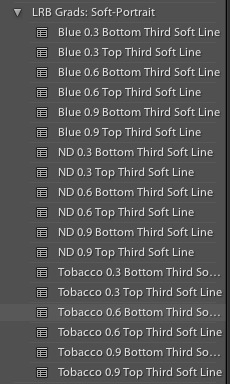
Here’s roughly how they look, first the hard set, then the soft.




Hi Sean, I've got it now.
I right clicked each of the Grad Presets and renamed them using a hefty amount of Ctrl-X and Ctrl-V (ie. copy & paste). They work a treat for me now.
I had thought that the "Third" referred to which third of the image was "masked", and so couldn't understand the Top and Bottom bit. Now that I know that "Top Third" & Bottom Third" refer to the position of the Horizon Line everything makes sense!
many thanks,
John
p.s. Would you like me to email the re-named presets back to you, in case anyone else might want them that way round, to save you the bother?
John
Colour-Strength-Horizon position in thirds-soft/hard reference.
Unfortunately Lightroom won’t allow the same names so the endings have to differ.
The internal choices are:
Colour: Blue, ND, Tobacco.
Strength:0.3, 0.6, 0.9
Horizon position: Top, Bottom
Line: Soft or hard, also set in the folder name, but we need to have different names per folder.
Hi Sean, sorry to be a nuisance. Following on from my earlier post could you clarify the naming convention you have used for your Grad Presets. I’m confused!
For example in: LRB/Grads-Hard-Landscape/
Blue 0.3 Bottom Third-HL adds a Blue Gradient to the top two-thirds of my landscape image;
Blue 0.3 Top Third-HL adds a Blue Gradient to the top third of the image. And so on.
thanks,
John
Just insert a number at the start of the name to create an order… 01, 02 etc.. It needs a leading zero to work
You could just rename them!
Hi Sean, your Grad Filter Presets are simply fab! Thanks for creating them. I find taht I use them by first choosing Top or Bottom , then Colour, then Strength. Would it be easy for me, or you, to re-arrange them so that all the Bottom Thirds are together in Colour then Strength order, and all the Top Thirds are together in Colour then Strength order. This would make it easier for me to compare the effect of each Grad filter to it’s “nearest neighbour” in the Navigator. I simply want to choose say Bottom Third / Blue / then compare 0.3 / 0.6 / 0.9 then maybe try Bottom Third / ND / 0.3 / 0.6 /0.9 and so on.
Many thanks, John (JBtheLD on the lightroomforums.net)
There’s no way to mask the grads, but it might make a good feature request.
Great info – thank you!
Question – is there a way to brush out the grad filter like on a mask. For example, if you pull blue down and there is something in the foreground it will tint it.
Sue, Try right click the link and Save target as.. or Download Lined file as and put it in it’s own folder. Extract it from there.. I suspect it is extracting okay, but getting lost somewhere (er… I do that all the time)
There’s 6 folders in the zip. LRB Grads is the prefix name on each folder.
Hi Sean – I seem to be having a problem with the zip file (Windows Vista Ultimate). When I download it I get the message that the file is already there. When I look at the folders after extracting them there is nothing in them. I am sure it is just some stupid little thing I am missing but would appreciate some help….we are sure lucky to have someone like you out there making our lives easier – thanks!! Susan
Hey Mike,
That’s an interesting one.
I can make a guess though, but first some questions:
What camera?
Is Auto rotate on, or do you manually rotate?
Do some of the portrait ones work instead?
Unfortunatley, Lightroom doesn’t apply the filter to the current upright state, it seems to be based on the auto rotate of the camera. That’s why there’s 2 portrait settings, one for camera turned up and one for camera turned down..
Come back to me with the info and I’ll be happy to customise the set.
Actually if you wish, send me one of the original files, by attaching it to a reply from the download link!
Sean
OK – I downloaded and installed as directed. Problem is, all the landscape presets appear on the left side of the image!?
Any thoughts?
thanks
Presets can only work with existing tools, and there’s no Grad Filter in Version 1 of Lightroom. You can reply to me using the download email to discuss this further.
Sean,
I purchase and downloaded your grad filter presets,but none of them seem to work. I’ve loaded them into the LR Presets folder, but their effect doesn’t show in the Preview window and they don’t work when I select them. I’m running LR 1.4.1.
Thanks Sean worked a treat. Probably been said many time but great site and thanks for the efforts you are putting in.
David
Try reinstalling David. Otherwise try creating the folder Develop Presets yourself.
I’ve heard someone mention this happened to them, but that a reinstall solved it.
You’ll most likely need to do this for Web Galleries anyhow, unless you’ve previously installed a third party gallery.
Hi Sean
I have been using Beta 2 since it came out and ordered LR2 as soon as it was released but as yet no show. I was advised by Adobe to download the trial until I received the full version.
I have bought the Grads and also downloaded the latest scrolling gallery BUT in Library/Application Support/Adobe/Lightroom/ there are no development pre sets only a module folder which is empty, any suggestions.
Great stuff by the way
Regards
David
Thanks for posting these Sean: really useful & well worth €5 or anyone's money for the time saved.
Hi, again,
The system keeps me from paying, sorry.