With Lightroom 4 out now, here’s some tips to help with tasks & features in Lightroom 4.
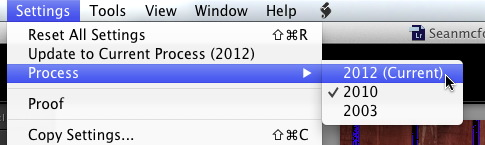
1. Process Version. Some people are getting caught out where they can’t see the new Develop features in Lightroom 4. This is because they’re still on an older Process Version. So if you don’t see Highlights and Shadows in Basic, or in Brush, click on the exclamation mark icon to update to PV2012. You can also do this in the Settings menu>Update to Process Version 2012, or in the Camera Calibration panel.
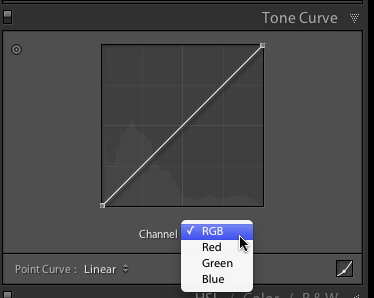
2. RGB Channel Curves. To access the new channel curves in Lightroom 4, go to the Tone Curve in Develop. Click the tiny Point Curve icon. Under the curve you’ll see where it says Channel: RGB, click ‘RGB’ to select from Red, Green and Blue channel curves.
3. Flagging. A word of warning about Flagging in Lightroom 4. It’s now a fully global tool, so if you’ve gotten used to it being local, you’ll need to work around this. Basically if you flag in a folder or Collection, it’s now flagged everywhere. If you used flagging in Collections to get different flagging for different tasks, I recommend ticking the ‘Make new virtual copies’ checkbox so you can change the flagging on virtual copies instead. Not optimal, but it will help.
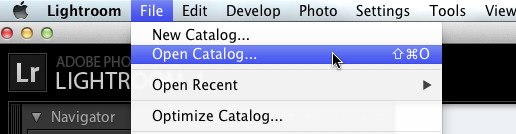
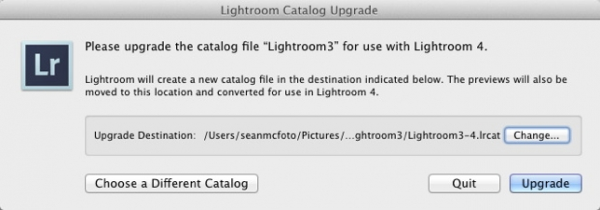
4. Catalogs. If you’ve got a load of catalogs (I won’t judge you!), it’s probably best to update them all. Use the File>Open Catalog command and select your Lightroom 3 catalogs from there. After restarting automatically, you’ll be prompted to upgrade the catalog. Repeat for all catalogs.
5. Padding in Books. It’s actually possible to move a photo cell about the page in Book. It’s not obvious because by default, there’s only one slider visible for padding in the Cell panel. Clickin the almost hidden disclosure triangle open up options for top, bottom, left and right padding. Mixing a full page template with zoom and padding lets you put the image wherever you want on a page without needing a specific template.

6. Type in Books. Hidden behind another disclosure triangle is access to advanced type control. These include Tracking, Baseline, Kerning, Leading (and auto versions), as well as Columns and Gutter.

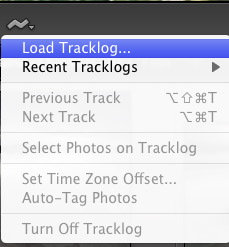
7. Tracklogs in Map. By clicking on the Tracklogs icon in the Map Toolbar, you access the Tracklogs menu. The top item is Load tracklog, which allows you to import a .gpx file. Lightroom will place this on the map and show that location. You can then drag photos to the tracklog, or try the Auto Tag function.
8. Email. You can now email directly from Lightroom via File>Email Photo. You can use either your default mail program, or enter you email details. Be warned, that using the latter, you don’t have a record of sent emails!

9. Trim a Video. To trim a video in Lightroom, click the little cog in the playback controller. This will bring up a tiny filmstrip. You can made it larger by moving the cursor to either end of the controller until it becomes a double headed arrow. Then click and drag to make it longer. To trim either move the black trim heads (with the double lines- ||) to where you want to trim. Alternatively, press play, and use the shortcut Shift I to the set start point (the In point, as it’s called), and the use Shift O to set the end point (or Out point).

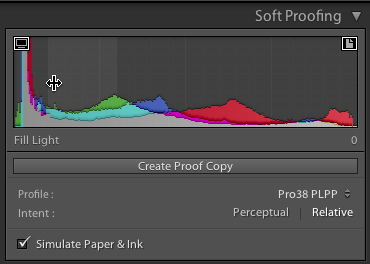
10. Soft Proof Warnings. You can turn on Soft Proof in Develop quickly using toggle shortcut ‘S’. All the action happens where the Histogram usually sits. Even if you don’t acutally soft proof for print, it can be useful to see where your monitor can’t reproduce your colour correctly. The left icon at the top is the montior gamut warning. Hover over this to see where the monitor is having trouble. You’ll see blue over the trouble areas. For Print, select a paper profile and hover over then right icon.